
I’m so excited to keep sharing the details about our 2007 Keystone Raptor Toyhauler renovation. Today we’re focusing on my favorite room(s): the kitchen and living room!
I’ll list absolutely everything we used, and I’ll break it down by section. But first, let’s start with the mood board, shall we? I always recommend creating a mood board for any renovation project. It helps keep you focused and makes the whole thing so cohesive. If creating one feels overwhelming, I’d LOVE to help you. Click here to book.
Here’s what I created for our kitchen and living room:

I fell in love with this wallpaper from Loomwell and pulled the paint colors for the entire RV from it. I also was really inspired by this renovated Airstream kitchen where Bonnie Christine mixed green cabinets and copper details. These two images, plus the extra details I added, guided every decision and purchase I made for this room. Let’s get into it!
Toyhauler Renovation: Kitchen & Living Room Colors
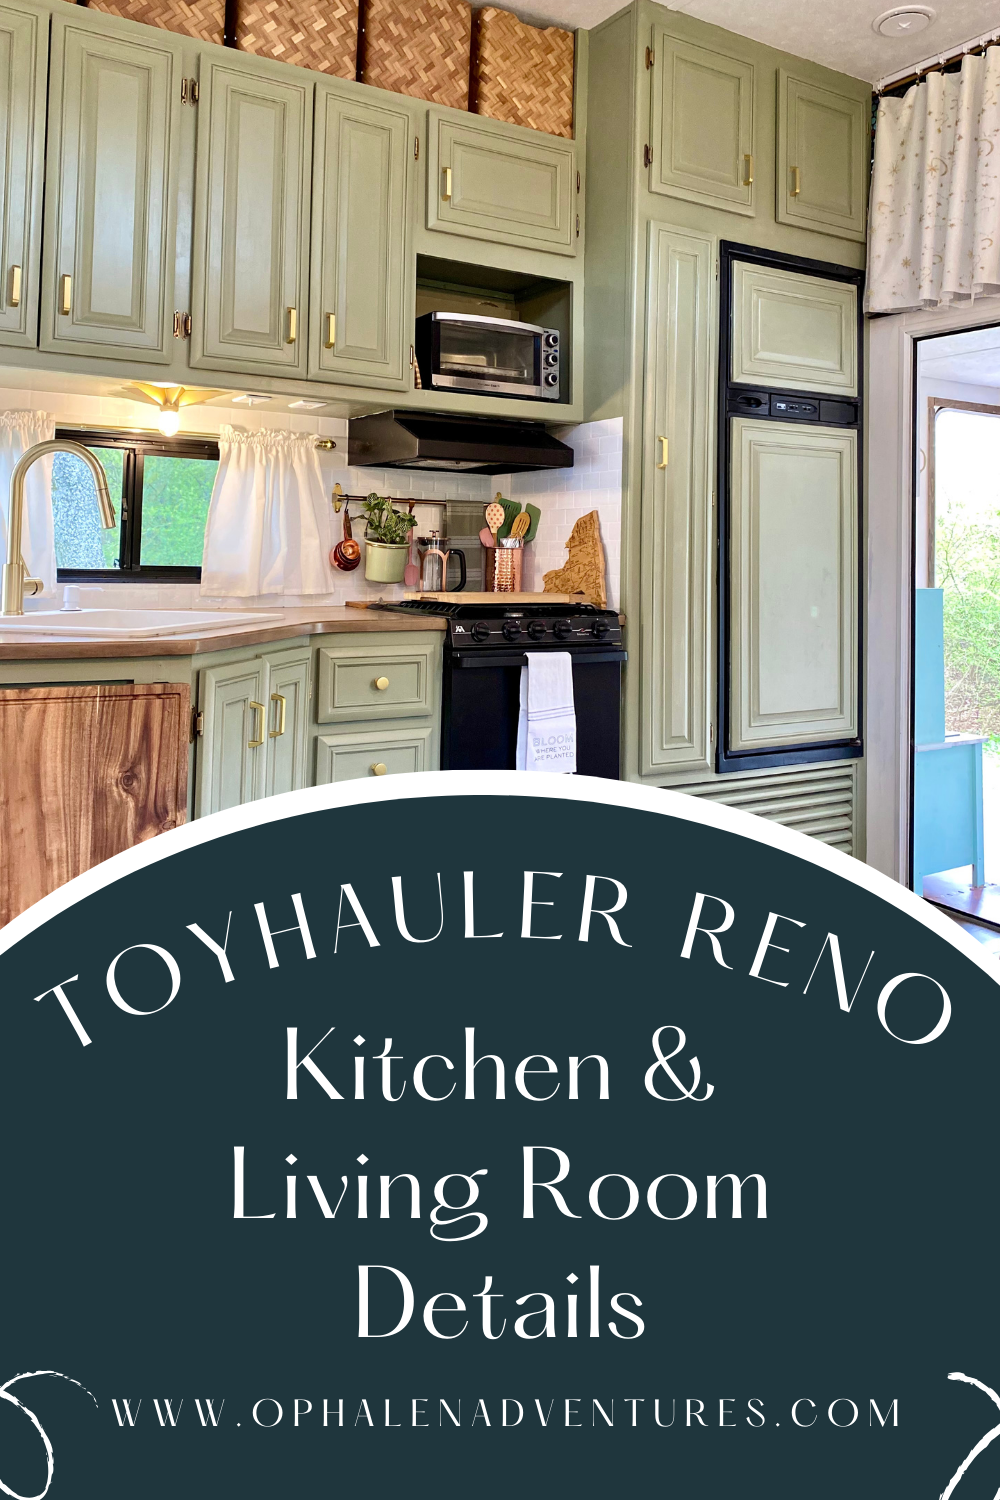
Paint colors: Kitchen cabinets are Behr Muted Sage and walls are Behr Swiss Coffee
Primer and paint details: Everything was primed with Kilz adhesion primer and painted with Behr semi-gloss interior paint
Wallpaper: Loomwell Mila Wallpaper {use KATEOPHALEN code for 15% off}
Flooring: Lowe’s Smartcore Interlocking Vinyl Plank that clicks together with no glue or subfloor prep
Toyhauler Renovation: Kitchen Details


Kitchen Faucet: Tohlar Gold Kitchen Faucet
Kitchen Sink: Elkay Classic White Drop In Sink
Kitchen Backsplash: Tic Tac Tiles
Kitchen Baskets: IKEA Bullig Bamboo Box
Kitchen Cabinet Hardware: Home Depot Satin Gold Cabinet Pulls
Kitchen Countertop Extension: Oversized Heavy Duty Cutting Board with Folding Shelf Brackets
Kitchen Counter Color: Retique It Stainable Wood Paint and Graining Tools
Kitchen Star Light: Viluxy Flush Mount Brass Star Light with 12v Bulb
Kitchen Utensil Bar: IKEA Hultarp Rail and Container
Copper Colored Coffee Making Setup: French Press and Electric Kettle
Copper Measuring Cups: Bought at TJMaxx, here are similar ones
Copper Utensil Holder: Bought at TJMaxx, here is a similar one
New York State Cutting Board: Bamboo NYS Cutting Board
Produce Bags: Mesh Hanging Produce Bags
Toyhauler Renovation: Living Room Details


Sectional: West Elm Andes Sofa that we already owned
Ceiling Globe Lights: West Elm Sculptural Globe Flush Mount in 8″ (and we added a switch)
Over Couch 12v Lights: LED RV Globe Lights
Slide Trim: 1″ x 6″ Wood Board Sanded and Stained
Ceiling Fan and Light: Honeywell Ceiling Fan
Art Cart: 3 Tier Metal Rolling Cart
Yellow Blackout Curtains: IKEA Majgull Room Darkening Curtains
Cream Blackout Shades: Levolor Cut-to-Fit Blackout Shades
Wall Hanging Rack: Already owned, here is a similar one
Cork USA Map: Cork Board USA Map and Pins
Laptop/Paperwork Wall Rack: Purchased from a discount store, here is a similar one
Gold Trash Can: Purchased at TJMaxx, here is a similar one
Gold Door Knob: Satin Brass Lever Knob
Curtain Tie Backs: Made from Wooden Beads and Twine (also used for the bedroom chandelier!)
Curtain Rod Mounts: Command Hooks spray painted black
Floor Vents: Metal Floor Register spray painted brown to match flooring
Toyhauler Renovation Summary
Going back to round up everything I did in our toyhauler renovation kitchen and living room made me tired all over again. It really was doable and worth it, though! The most time-consuming part was definitely priming and painting every surface.
Some RV renovation specific things I learned during this process were:
- Be aware of how much weight you’re adding
- You can use any light fixture, just add 12v bulbs and a switch if it doesn’t have one
- You need this Ryobi multi-tool saw, I used it every day
- Keep in mind how everything will travel on move days
- Ripping up stuff to demo may bring unexpected setbacks (see the bedroom post) — don’t panic!
- Swapping out plumbing fixtures can be tricky, so don’t be afraid to hire a plumber for a day to connect everything (and make sure it’s tight!)
Head back to the RV Renovation Post to see the rest of the rooms!
Disclaimer: Product links in this blog post may be Affiliate links, and I will earn a small commission for each purchase made through these links at no extra cost to you. Affiliate income helps fund our family travel and allows me to keep creating inspiring family travel content for you. I so appreciate when you use my links to make purchases you would have made anyway.
For the complete RV renovation post, head here. For more posts on RV life:


Follow our adventures on Instagram:


Comments
One response to “Toyhauler Renovation: Our Gorgeous Kitchen & Living Room”
[…] Kitchen & Living Room […]